This baby is packed to the brim with anti-aging actives that help you slow down premature aging and keep wrinkles off your face for that little big longer. Here’s how:
P.S. Don’t get scared by its tiny size. That’s just a PR sample. The full size has an airless pump dispenser and contains 1 ounce of serum.
Key Ingredients in Garden Of Wisdom Eternal Youth Elixir
Antioxidants To Prevent Wrinkles
Garden Of Wisdom Eternal Youth Elixir is packed with antioxidants. Here are the highlights:
When it comes to antioxidants, your skin can’t get enough. The more, the merrier.
Peptides are all the rage now. Garden Of Wisdom Eternal Youth Elixir has two:
I’m on the fence re peptides. On one hand, there’s not much proof they work. Most of the studies on peptides still come from the manufacturer. On the other hand, women who use them say it helps them firm skin and reduce the appearance of wrinkles.
One thing’s for sure: peptides are the building blocks for amino acids, which are the building blocks for proteins. Collagen and elastin, the scaffolding that keeps your skin firm and elastic, are proteins.
Get where I’m going? Even if they’re not the miracle workers the manufacturer makes them out to be, they likely do something for the skin.
I don’t suggest you go out and splurge on an expensive serum just because it has peptides. But when you come across an anti-aging serum with proven actives like antioxidants that also happen to have peptides, why not? 😉
When this protective barrier stops working, your skin dries and withers like an old prune. Germs and bacteria get in and irritate your skin like crazy.
Making sure your protective barrier stays intact and healthy is a top priority, especially if you have dry skin. That’s when ceramides come in. They patch up any holes in your barrier, keeping it whole and strong.
P.S. Garden Of Wisdom Eternal Youth Elixir also has cholesterol, another building block of your skin’s protective barrier.
Your skin feasts with all that moisture. It plumps up fine lines and wrinkles so they look smaller. It softens the texture of your skin, so that it feels like that of a baby. It brightens the complexion and gives it a dewy glow.
It does a great job at hydrating my skin. I use a moisturiser afterwards anyway, but since I’ve started using it I can see a difference in the texture of my skin. It’s softer to the touch and plumper. My crow’s feet are less noticeable now.
It also strengthens my skin’s protective barrier. The weather’s getting warmer now but here in London we still have cold windy days and the serum helps me withstand their assault. When I get home, my skin is still as soft as it was in the morning.
It’ll take way longer to see its anti-aging benefits. Antioxidants work by preventing damage so the fact my skin is still in top shape is a good sign!
If you’re ready to up your antiaging game or would like to add some hard-to-find antioxidants to your skincare routine (alpha lipoic acid, anyone?), this is well worth a try.
Have you tried Garden Of Wisdom Eternal Youth Elixir? Share your thoughts in the comments below.
Ingredients: Liposom Base (soy), Infusion of (Broccoli Sprouts, Grapeseeds, Green Tea), Hyaluronic Acid, Matrixyl 3000, Syn-Coll, Ceramides (blend of many), Niacinamide, Leucidal SF (Lactobacillus ferment), R-Alpha Lipoic Acid, Resveratrol, Super Oxide Dismutase
Take The Guesswork Out Of Skincare Shopping
Get access to the “Pro Skincare Library” for exclusive skincare routine “cheat sheets” and tricks to help you navigate the beauty aisles jungle like a pro and immediately know what to pick off the shelves to achieve the gorgeous skin of your dreams – even when you’re drowning in an endless sea of skincare products.
Success! Now check your email to confirm your subscription and get access to the skin library.
Name: Kavita Mariwalla, MD, FAAD Practice setting: Private practice Skin type: Fitz Type IV / combination Age: 42 Real job: Mom of 3 little boys Disclaimer: This is my summer routine which I change up for fall/winter. AM: Cleanser: SkinFix foaming oil cleanser in the shower. It foams despite being SLS free. I am all […] Read more…
It’s the newest exfoliating acid on the skincare block. It shot to fame in Asia thanks to its gentle touch. Word on the street has it, even sensitive skin can use it without risking irritation.
You’ll find it in both Stratia Soft Touch AHA and The Ordinary Mandelic Acid 10% + HA. At first sight, the two are so similar, you could call them dupes. But when you dig deeper, one definitely has the edge. So, which one is better?
Mandelic Acid
Mandelic acid belongs to the same family as glycolic acid, AHAs. But it’s twice its size. Literally. Mandelic is 152.1 daltons while glycolic 76.
Size matters: because mandelic acid is so big, it penetrates skin more slowly and not as deeply as glycolic acid. That means it can dissolve the “glue” that holds skin cells together without irritation.
Once those dead cells are off your face, your skin is smoother, softer and brighter. It’s just that mandelic takes a little longer than glycolic to work so don’t be surprised if you don’t see results immediately.
Mandelic acid isn’t good just for sensitive skin. This acid also has antibacterial properties that help you get rid of P. Acnes, the bacteria that’s making you life so miserable.
Hyaluronic acid is a moisture magnet. Literally. Its job is to draw water from the air into the skin and bind it there. It’s so powerful, it can hold up to 1000 times its weight in water!
But what if there’s not enough moisture in the skin? Then, hyaluronic acid takes moisture from the deeper layers of your skin all the way up to the superficial layers.
It’s not as drying as you think. Your skin is made up of 64% water. Hyaluronic acid just redistributes it. Once the superficial layers have this extra moisture, it plumps up so fine lines looks smaller and takes on a dewy glow.
I wouldn’t say one is better than the other. I just think it’s great both companies added something to offset any potential irritation (even though the risk with mandelic acid is low to begin with).
FYI, it’s NOT toxic. It releases too little formaldehyde to give humans cancer. But that little can still irritate sensitive skin.
The Ordinary opted for Caprylyl Glycol, a preservative that’s way gentler for sensitive skin. Its antimicrobial activity isn’t as strong, but it’ll still help to keep your exfoliant safer for longer.
Lesson learned: when the main actives are the same, it’s those little ingredients no one pays much attention to that can make the difference.
Get access to the “Pro Skincare Library” for exclusive skincare routine “cheat sheets” and tricks to help you navigate the beauty aisles jungle like a pro and immediately know what to pick off the shelves to achieve the gorgeous skin of your dreams – even when you’re drowning in an endless sea of skincare products.
Success! Now check your email to confirm your subscription and get access to the skin library.
I’ve been really pleased to see more cosmetically elegant sunscreens coming onto the market, and Ultra Violette is one of the most hyped-up brands to launch recently. This Australian brand has come out with three different facial sunscreen formulas, and sent them to me to try.
About Ultra Violette
Ultra Violette is all about sun protection, as you can probably tell from the name. Their mission was to create “facial sunscreens that looked good, felt nice to wear, and didn’t bore us to tears”. As an Australian brand, their products comply with Australian sunscreen standards, which means (amongst other things) that the broad spectrum UVA rating is more stringent than the US criteria (you can read more about differences in UVA ratings here).
Ultra Violette call their sunscreens “skinscreens” – since they have skincare benefits as well as sun protective properties. Much like for moisturisers, there are a few versions available, depending on your skin’s needs:
Supreme Screen: A hydrating sunscreen that does triple duty as moisturiser, primer and sunscreen, for all skin types
Queen Screen: A luminising sunscreen that acts like a serum, for normal and dry skin
Clean Screen: A mattifying physical (inorganic) sunscreen, for all skin types especially sensitive skin
All three are housed in stylish and unusually saturated blue packaging, which made my camera freak out a little – it’s reminiscent of Yves Klein Blue to my uncultured eye.
Awesomely, Ultra Violette have made the full ingredient lists available for their sunscreens. In Australia, only the percentages of each active ingredient are required since sunscreens are classified as therapeutic goods (drugs), which means most sunscreen brands have decided that it’s better to hide their formulas (from competitors maybe, or from well-intentioned consumers with scaremongering ingredient scanner apps). Ultra Violette have all of the information out in the open, which is great for me as an ingredient nerd.
I also really like that Ultra Violette are very clear on how much sunscreen you need to wear for effective coverage for your face, neck, chest and ears (5 pumps of Clean/Supreme Screen, and 2.5 droppers or pipettes full of Queen Screen). This is a big difference from the dodgy claim of “a little goes a long way” that a lot of other brands use – I suspect to get you to forgive them for a really unpleasantly textured, heavy product. They’re also very upfront about how long one sunscreen will last if you apply the right amount (40 days).
On the down side, the marketing does encourage you to mix the sunscreen with foundation or moisturiser, which I wouldn’t recommend, since it can interfere with film formation and lead to holes in your protection (more on this in my video on how to use foundation and sunscreen together).
Supreme Screen SPF 50+ Hydrating Facial Sunscreen ($47 AUD for 50 mL) is my favourite of the three sunscreens. It’s a beige cream that comes in a tube with a pump top, and is designed to be a moisturiser, sunscreen and primer. It claims not to interfere with foundation, and I found that to be the case – there was no balling or separation with the three foundations I tried it with.
My favourite thing about Supreme Screen is the texture. It’s lightweight and feels like it sinks in very quickly. The texture is very much like another one of my favourite Australian sunscreens, Mecca’s To Save Face Superscreen SPF 50+ (not so coincidentally, the founders of Ultra Violette used to be part of Mecca’s product development and worked on their sunscreens).
The big difference between the Mecca sunscreen and Supreme Screen is the filters. Supreme Screen has the newer generation organic filters Tinosorb S and Tinosorb M, along with octinoxate. Tinosorb S is one of my favourite filters since it’s a very photostable and effective UVA filter. I’m usually a bit more Octinoxate is generally not very stable, but the Tinosorbs will stabilise it (more on how sunscreen filters interact in my eBook sample chapter).
In terms of skincare ingredients, there’s Penavitin (saccharide isomerate), which is a humectant moisturiser that’s doing a lot of the hydrating work and claims to hydrate for 72 hours, along with other humectant workhorses glycerin and butylene glycol. While there’s alcohol near the top of the ingredients list, I think the humectant-heavy formula more than compensates for it, and overall my skin didn’t feel dehydrated at all.
There’s also Kakadu plum (Terminalia ferdinandiana fruit extract), a natural source of vitamin C and other antioxidants, and Dragosine Plus (L-carnosine), a dipeptide naturally found in the body that can act as an antioxidant, and claims to protect against infrared, visible and blue light.
Supreme Screen is also the most lightly scented of the three sunscreens, which I appreciate for a product I need to apply heavily. Overall, I pretty much have no complaints about this sunscreen – it’s shot up to Holy Grail status for me.
Queen Screen SPF 50+ Luminising Sun Serum ($47 AUD for 50 mL) is a liquid sunscreen that comes in a dropper bottle. It’s designed for sensitive, normal and slightly dry skin. It’s a runny translucent white liquid.
I’ve heard fantastic reviews for Queen Screen from people with drier skin, so I think your experience will very much depend on your skin type. Since my skin is more on the normal-oily side, this wasn’t really designed for me, but I gave it a solid go anyway.
While it’s oil-free, Queen Screen felt like it never really set on my skin and slid around on my face a bit, so my foundation tended to bunch up throughout the day. The texture was fine if I applied less, but less sunscreen means lower protection, and I like high protection. It worked well under foundation, and definitely gave me a glowy look, but as someone with oily skin I’ve spent a lot of my life fighting oily glow. So in short – while it might be amazing for dry skin, tread with caution if your skin is on the oilier side.
Like Supreme Screen, Queen Screen contains Pentavitin, Kakadu plum and Dragosine Plus. It also has a lot of hydrating glycerin. I wasn’t a big fan of the fragrance which is pleasantly rose-like, but I found it a bit overwhelming.
Clean Screen SPF 30 Mattifying Mineral Skinscreen ($42 AUD for 50 mL) is Ultra Violette’s physical sunscreen. It contains 20% zinc oxide, but it does have a lower SPF rating than the other two sunscreens (and a lower price tag). It’s recommended for all skin types, particularly for sensitive skin, and has a mattifying texture.
I really liked the texture of this sunscreen – it’s probably my favourite texture from all of the physical sunscreens I’ve tried so far. But my main issue with this (and every other physical sunscreen I’ve tried) was the white cast. Unfortunately even one pump of this sunscreen was white enough that I needed a lot of foundation to cover it up. If your skin is lighter (I’m NC 20-25) then you’ll probably have better luck.
Skincare-wise, Clean Screen contains humectant Pentavitin as well as antioxidant and anti-inflammatory green tea extract, soothing cucumber extract and moisturising rose hip oil. Like with Queen Screen, the fragrance was a bit too heavy for my liking. I also found that I had some clogged pores after a few days of wearing this, which is standard for my skin with all of the inorganic-only sunscreens I’ve tried so far.
Active Ingredients: Zinc Oxide (20%)
Inactive Ingredients: Aqua, Isoamyl Laurate, Caprylic/Capric Triglyceride, Sorbitan Stearate, Cetearyl Alcohol, Hydroxypropyl Starch Phosphate, Phenethyl Alcohol, Caprylyl Glycol, Glyceryl Isostearate, Xanthan Gum, Saccharide Isomerate, Citric Acid, Parfum, Cetearyl Glucoside, Polyhydroxystearic Acid, Sucrose Cocoate, Rosa Canina Fruit Oil, Carthamus Tinctorius Seed Oil, Sodium Chloride, Glycerin, Cucumis Sativus Fruit Extract, Camellia Sinensis Leaf Extract, CI 77492, CI 77491, CI 77499
Products were provided for review, which did not affect my opinion. For more information, see Disclosure Policy.
Q: I recently cut my hair into a pixie, and I’m having trouble deciding whether I should keep it short or let it grow into a bob.
Iris recently cut her har into a short pixie.
My hair is very fine and slightly wavy. My challenge when it is long is that my hair is extremely thin, and needs a cut that adds volume.
Iris has naturally fine, wavy, dark brown hair.
I also have a lot of trouble maintaining the “baby curls” near my temples, so my stylist cuts them all the way down to manage the frizz. Sometimes I straighten them to keep them tame.
Additionally, I don’t know what colour would bring out my skin tone best. My hair is naturally dark brown but currently, I have it light brown with blonde highlights. I’ve been dyeing my hair for several years now, and my hair tends to become dry from the chemical treatment.
Currently, Iris has light brown hair with blonde highlights.
Can you offer some suggestions on the best cut for my face as well as colour for my skin tone? I want a cut and colour I can stick with for a while. Thank you in advance. — Iris
Iris is looking for the best cut and colour for her face and skin tone.
A: Iris, I would grow your hair a little bit longer. You will need to start by growing out your bangs.
Halle Berry at the 2013 Champs-Élysées Film Festival.
Jenna Elfman at The Heart Truth’s 2012 Red Dress Fashion Show.
I would grow your hair into a short, French-textured bob. Your bangs should be a side-swept fringe that lands on your cheekbone.
Mariska Hargitay at the 2007 Emmy Awards.
Short bob with side-swept bang
Rachel McAdams at the 2015 New York premiere of ‘Southpaw.’
Rachel McAdams at the 2015 Gotham Independent Film Awards.
The nape area should be a little softer to create a feminine look—a soft, layered blunt at the back. That’s a technical hair term. Whoever is going to do it for you will understand this.
As for your colour, you need to remove those highlights. They’re sticking out and were not done with flair.
Let’s stick to one colour for about six months to a year. I like that sun-kissed brown that you have in your second photo. You suit that type of rusty brown.
When you have a bit longer hair, then you can create more texture with highlights. But they should only be in certain areas—not in stripes coming down from the roots. They should be tucked under, like peek-a-boo highlights. It will look softer this way. You can also highlight a little bit more at the ends of your hair.
Jennifer Lopez at the 2017 NBC/Universal Summer Press Day.
The highlights will give you the volume you are looking for, and a lot more finesse. Your hair is going to look very pretty, feminine and chic.
Every Summer I search high and low for a new and signature fragrance for the warmer weather and truthfully don’t get much further than Estée Lauder Bronze goddess (there was that Summer I dabbled with Tom Ford but that was a bold and expensive move). As much as I love Bronze Goddess and will more than likely purchase a bottle come June, I constantly crave the new and dare I say something that isn’t the same as what everyone else is wearing. Admittedly I did consider keeping Dolce & Gabbana Light Blue Sun Pour Femme entirely to myself like some kind of sordid secret but that would be a disservice to the beauty community and this wonderfully sunny scent.
Let’s skip the small talk in regards to the packaging; the box has had a make-over, featuring the signature D&G lemon print and the bottle has gold and white accents, opposed to the original blue and silver colourway. What I’m trying to say is, as nice as the box and bottle may be, all that really counts here is the juice and my goodness what a sunny treat that has turned out to be.
Yes Dolce & Gabbana Light Blue Sun Eau de Toilette does have hints of the original and best selling fragrance (do you recall when absolutely everyone wore this zesty scent?) but this time the somewhat overzealous citrus note has been parred back and replaced with more "milky" accents. As such it very much feels like a brand new fragrance, no lazy rose notes or pink packaging, this has been completely rethought and reworked and is firmly on its way to cementing itself as the scent of Summer 2019.
I hate to say it but yes, if you do enjoy Estee Lauder Bronze Goddess, then you will more than likely lap up Dolce & Gabbana Light Blue Sun Eau de Toilette; they share the same light, fresh feeling and combine similar notes of coconut and vanilla. I’d also draw comparisons to the super pricey Tom Ford Eau de Soleil Blanc but would go as far as saying the Dolce & Gabbana version wears far longer on the skin.
With top notes of: apple, coconut and lemon, if ever a scent could be deemed beach worthy this is. To add a creamy element and of course for prolonged wear the base notes are far less "punchy" and consist of cedar, vanilla and white musk. Dolce & Gabbana Light Blue Sun Pour Femme is all you could possibly want from a seasonal fragrance and more.
Dolce & Gabbana Light Blue Sun Eau de Toilette £51.30/50ml via John Lewis – link.
Getting makeup to stay put was a struggle. Foundation would slip off my forehead every few hours, even if I powdered it up. I couldn’t leave the house without blotting papers. And don’t get me started on pimples.
Since moving to London 4 years ago, my skin did almost a complete turnaround. I say almost because, even though it’s got a little drier everywhere, as the temperatures start to rise again, my t-zone gets back into the habit of pumping out more oil than it needs.
Not as much as in my school days (puberty probably had something to do with that), but enough to bother me. But now, when this happens, I turn to Bioderma Sebium Mat Control Moisturizer. Here’s why:
Key Ingredients In Bioderma Sebium Mat Control Moisturiser
Silicones To Absorb Excess Oil
Hear me out before you jump on the “I hate silicones” bandwagon. They’re not the bad boys of skincare they’re made out to be.
Quite the opposite. Silicones are so versatile, they have a few tricks up their sleeves. For starters, they’re what gives Bioderma Sebium Mat Control Moisturizer its incredible mattifying properties. They absorb excess oil and help keep shine off your face.
Silicones also fill in fine lines and wrinkles so they look smaller to the naked eye. Plus, they give slip to a product and make your skin feel silky soft to the touch. Without giving you breakouts or suffocating your skin.
It’s true silicones create a barrier on the skin. But this barrier isn’t impenetrable. Silicones are big molecules and when they join together, they leave gaps in between one another. Your skin can still perspire through these gaps. Phew!
Bioderma Sebium Mat Control Moisturiser isn’t the most lightweight lotion I’ve ever tried, but I wouldn’t call it thick, either. It’s somewhere in between, has good slip that makes it glides smoothly on the skin and sinks in in seconds.
The first thing I noticed is how velvety soft my skin was. There was also a slight blurring effect that made the larges pores around my nose look smaller. Of course the effect is temporary, but I’ll take it.
It also does a good job at hydrating skin. It wouldn’t be enough in winter when my skin gets drier, but for this time of year, it’s perfect. I put it on in the morning and my skin doesn’t feel tight or dry till evening.
But does it help with oil control? Yes. As soon as you put it on, it dries to a matte finish that lasts for a few hours. Normally, I’d have to use a blotting paper after 3 or 4 hours. When I wear this, I have only a tiny amount of oil around the 5 hour mark.
Bioderma Sebium Mat Control Moisturiser isn’t a miracle potion that makes oil completely disappear for the entire day. But it absorbs enough to keep the shine at bay for longer than normal. If you’re tired of blotting your face every couple of hours, give it a go.
If I had to find a fault with it, I wish it had more antioxidants. But then, this isn’t an antiaging product nor does it claim to be. I just an antioxidant serum underneath and I’m good to go.
Get access to the “Pro Skincare Library” for exclusive skincare routine “cheat sheets” and tricks to help you navigate the beauty aisles jungle like a pro and immediately know what to pick off the shelves to achieve the gorgeous skin of your dreams – even when you’re drowning in an endless sea of skincare products.
Success! Now check your email to confirm your subscription and get access to the skin library.
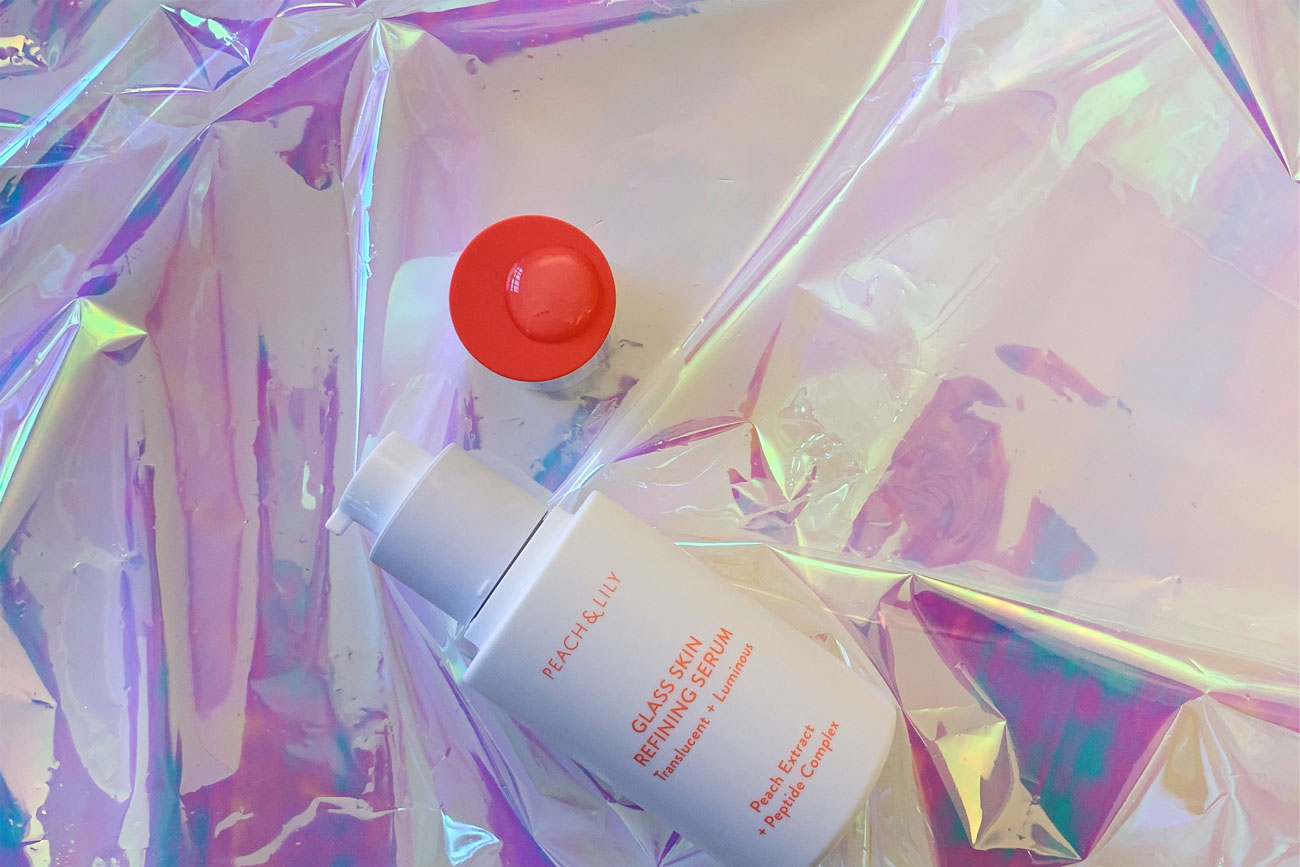
It’s been a year since we launched our Glass Skin Refining Serum over on Peach & Lily! And what an exhilarating year it’s been!
So many people have written in to tell us how the Glass Skin Refining Serum has helped turn their skin around, and it’s been such a joy and privilege to read everyone’s stories. We truly believe that it’s such a unique product (we’re not just saying this!), and we’re so glad that people have fallen so in love that they’ve been purchasing their second, third, fourth bottles!
In celebration of its 1-year birthday, here are three things that make the Glass Skin Refining Serum truly unique and one-of-a-kind!
It’s full of beneficial ingredients that help nourish, hydrate, and protect skin.
One of the star ingredients is peach extract, a luxe superstar ingredient you won’t find in many skincare products because it’s not the easiest to extract. We were determined to include peach extract in our Glass Skin Refining Serum because we know how powerful an ingredient it is — it’s full of essential fatty acids, vitamins, and minerals that really help nourish skin, helping provide the support skin needs to thrive.
Then, we added a slew of other beautiful ingredients, like madecassoside (soothing and healing properties), niacinamide (anti-inflammatory and brightening properties), and mountain yam extract (potent antioxidative properties). We also included our own proprietary hyaluronic acid complex to help hydrate to all layers of skin and our own proprietary peptide complex to help firm skin and minimize the appearance of pores.
All these ingredients together make a serum that really helps support skin, so it can have the appearance of glass — poreless, luminous, translucent.
It’s 100% worry-free!
There are over a thousand ingredients we don’t use; our Glass Skin Refining Serum is 100% toxin-free! (It’s also vegan and gluten-free. And cruelty-free.) That means it’s super gentle, appropriate for all skin types, and non-irritating!
It absorbs quickly into skin and leaves no residue.
With a cooling, light gel texture, our Glass Skin Refining Serum simply sinks into skin, leaving behind no residue or stickiness, no matter how many layers you apply — sometimes, Peach & Lily founder and esthetician, Alicia Yoon, uses half a bottle during one facial! Skin just looks plumped and hydrated and, well, glassy, instead of looking greasy and feeling sticky or tacky. Of course, you don’t need to apply half a bottle in one application; we recommend 2-3 liberal pumps.
If you have time, give yourself a mini facial massage as you apply the Glass Skin Refining Serum — and don’t forget to massage it into your neck, too!
For my spring skincare routine, I was planning to give you an “all Drunk Elephant” regimen, since so many of you have been asking me about their products.
But after several weeks of testing… I was too broken out to continue.
So, I now present you my “RECOVERING from Drunk Elephant” routine!
That’s right—I didn’t have the best experience with their products (which is why I decided to do this review instead). Most of them are just not suitable for acne-prone skin like mine.
Fortunately, the breakouts stopped as soon as I eliminated the culprits. But now, I’m dealing with the aftermath: post-acne marks!
In this routine, I’m sharing all the products I’m using to treat them, morning and night. (And in case you missed them, check out my previous routines for winter, fall and summer.)
My Spring Skincare Goals
My spring skincare routine is all about fading post-acne marks.
Okay, before we get into the routine, let me share my strategy here. (You might not be able to see the marks underneath my concealer, but trust me, they are there!)
Fading post-acne marks: There are actually two types of post-acne marks or discolourations that can occur after a bout of acne, and both are triggered by inflammation. Post-inflammatory hyperpigmentation (PIH) appears as brown marks, and is caused by an overproduction of melanin. Post-inflammatory erythema (PIE) is red or purple in tone, and caused by dilated blood vessels. Personally, I tend to get the reddish PIE marks to start, but if I’m not careful, they can turn into brown PIH marks over time. That’s why this routine includes topicals that address both, along with plenty of exfoliation to speed up cell turnover.
Protecting skin from the sun: Sun protection is always key, but especially when you’re dealing with post-acne marks, as the sun tends to darken them and make them hang around much longer. Obviously, you need a good SPF, but I think it’s also important to avoid the midday sun during this time (at least until the marks go away). I’ve found that even with sunscreen, any pigmentation can get worse if I’m spending a lot of time outside. Basically, I have to wear a hat or be a vampire for now!
Preventing new breakouts: As someone with acne-prone skin, I always have to be vigilant about prevention. I think my routines had been working so well for me, I got a bit overconfident when I went to try Drunk Elephant, never imagining it could break me out so badly! Lesson learned—I need to stick with simpler formulas with fewer, more lightweight ingredients.
As usual, most of the products below were purchased by me. For details on how I evaluate ingredients lists, see this tutorial.
One thing I’m doing differently this time is including my skincare gadgets, like the ZIIP, where they would fit within my routine (since a lot of you guys asked about this). But if I’m pressed for time, I certainly skip those extra steps.
My Morning Skincare Routine
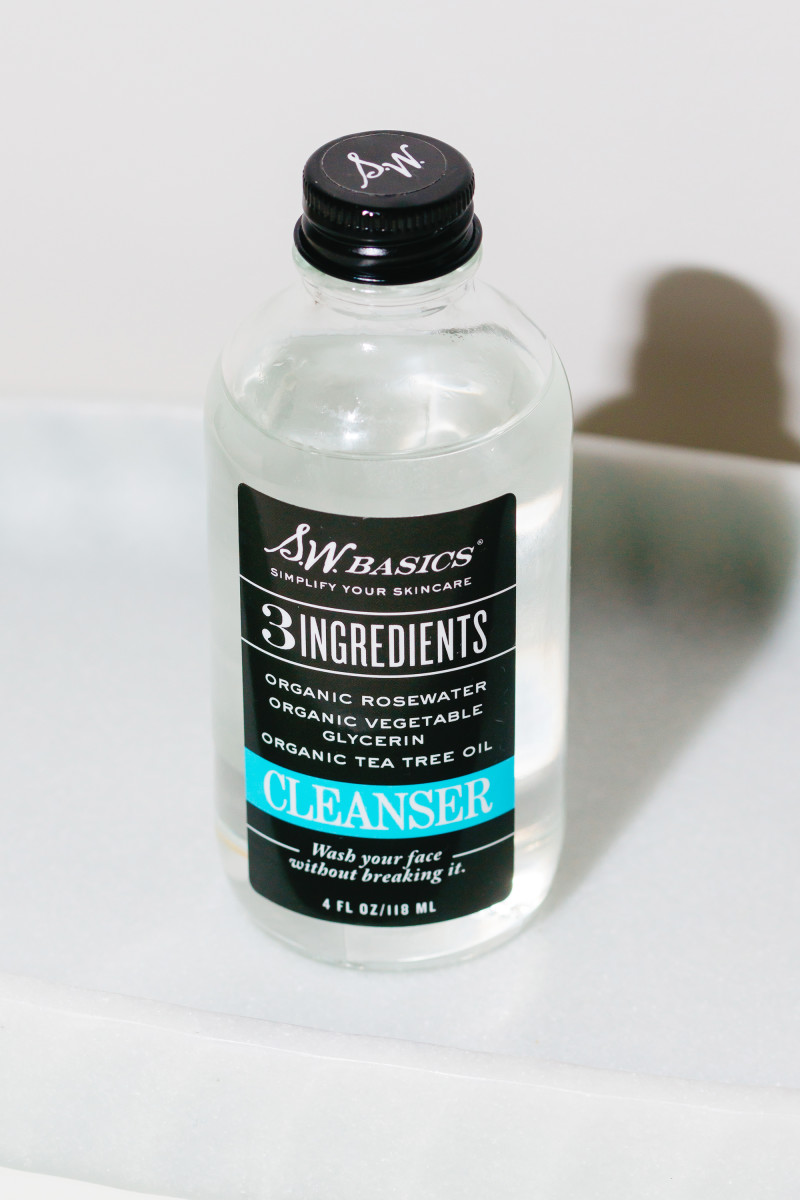
1. Cleansing Water:
S.W. Basics Cleanser
If I’m going to start my day by working out and/or using my ZIIP, I won’t jump in the shower to wash my face. I’ll simply saturate a Shiseido Facial Cotton with the S.W. Basics Cleanser and pass it over my skin. This is a cleansing water that contains rosewater, glycerin and tea tree oil—that’s it! Unlike micellar waters, you do need to rinse it off. It’s gentle yet effective and leaves your skin super soft. I will definitely purchase again!
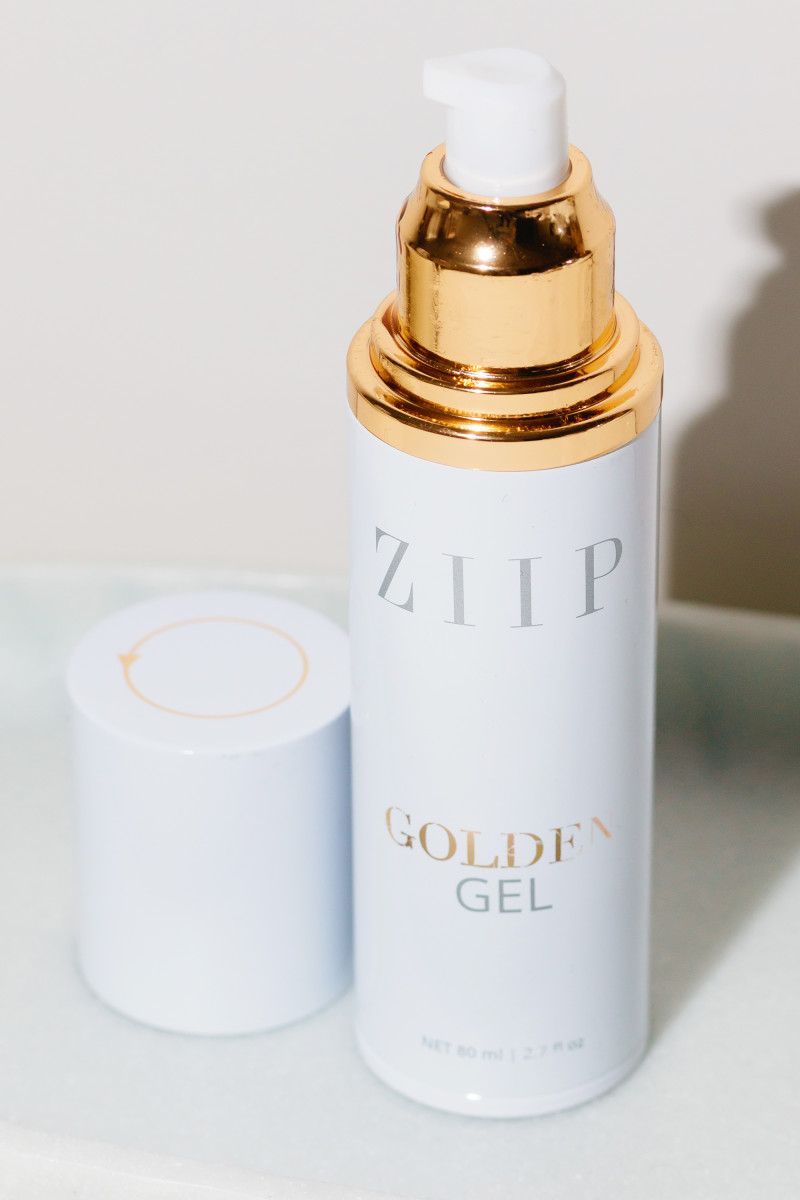
2. Conductive Gel:
ZIIP Golden Gel
If can spare the 15 minutes or so that it takes me to ZIIP, I’ll apply the ZIIP Golden Gel next. You always have to use a gel like this to ensure proper conductivity of the electrical current. This one is very gooey and an anti-aging treatment in itself, as it is spiked with various peptides and growth factors. Since it can migrate into my hairline, I like to do this whole procedure before I have a shower.
3. Microcurrent:
ZIIP Nano Current Device
Then I use the ZIIP Nano Current Device. It syncs with your phone, where you can choose from several programs, depending on what you want to target. For each one, there’s a step-by-step video to watch with founder Melanie Simon. Usually, I like to do the 12-minute “Energize” treatment for firming, tightening and brightening, followed by a few minutes of “Total Clearing” for treating and preventing acne. Honestly, I do see a difference!
4. Cleansers:
Youth to the People Superfood Face Wash and Omorovicza Cleansing Foam
Next, I jump in the shower and wash my face with one of two cleansers I have in there at the moment. I recently bought the Omorovicza Cleansing Foam, after much internal debate because it’s ridiculously expensive… yet the reviews are so positive. I’m glad I finally pulled the trigger! It’s creamy yet foamy and just SO GOOD. Probably the best cleanser I’ve ever used, and that’s saying a lot.
To make it last longer, I’m alternating it with Youth to the People Superfood Face Wash, which is actually a very nice gel cleanser. I don’t find it drying at all, which is unusual.
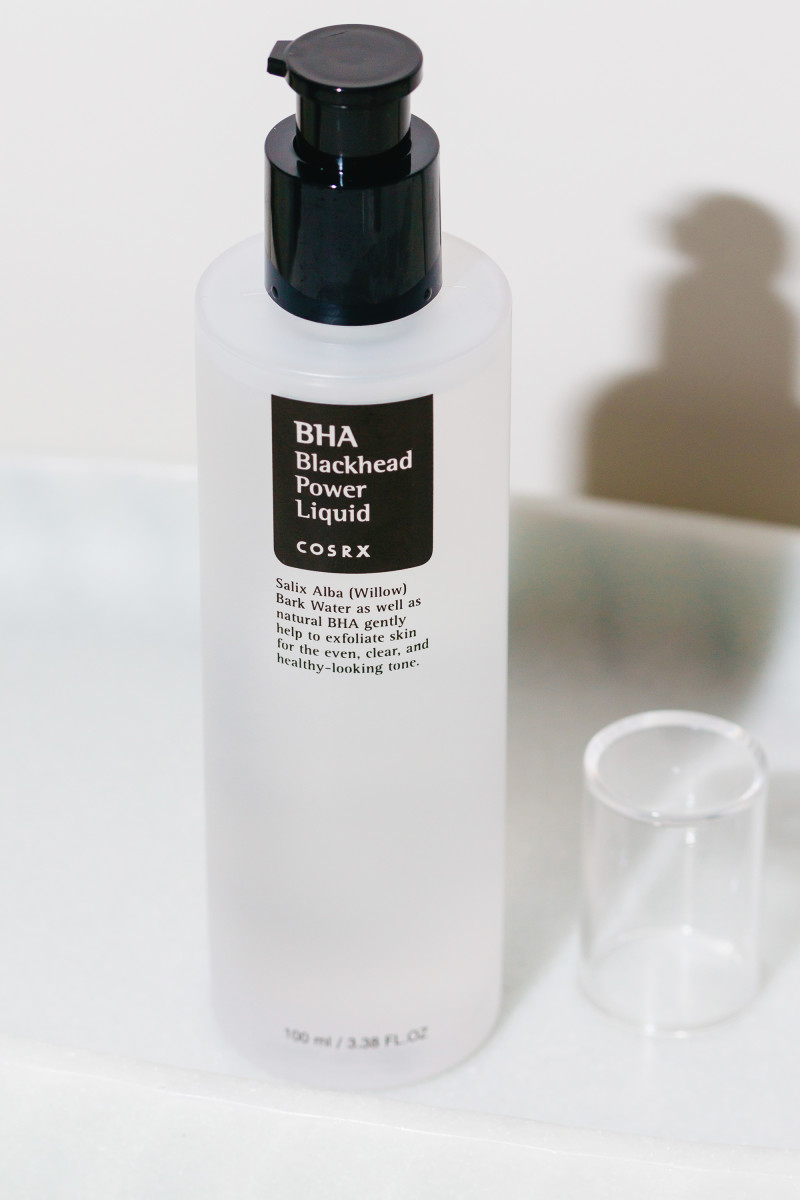
5. Acid:
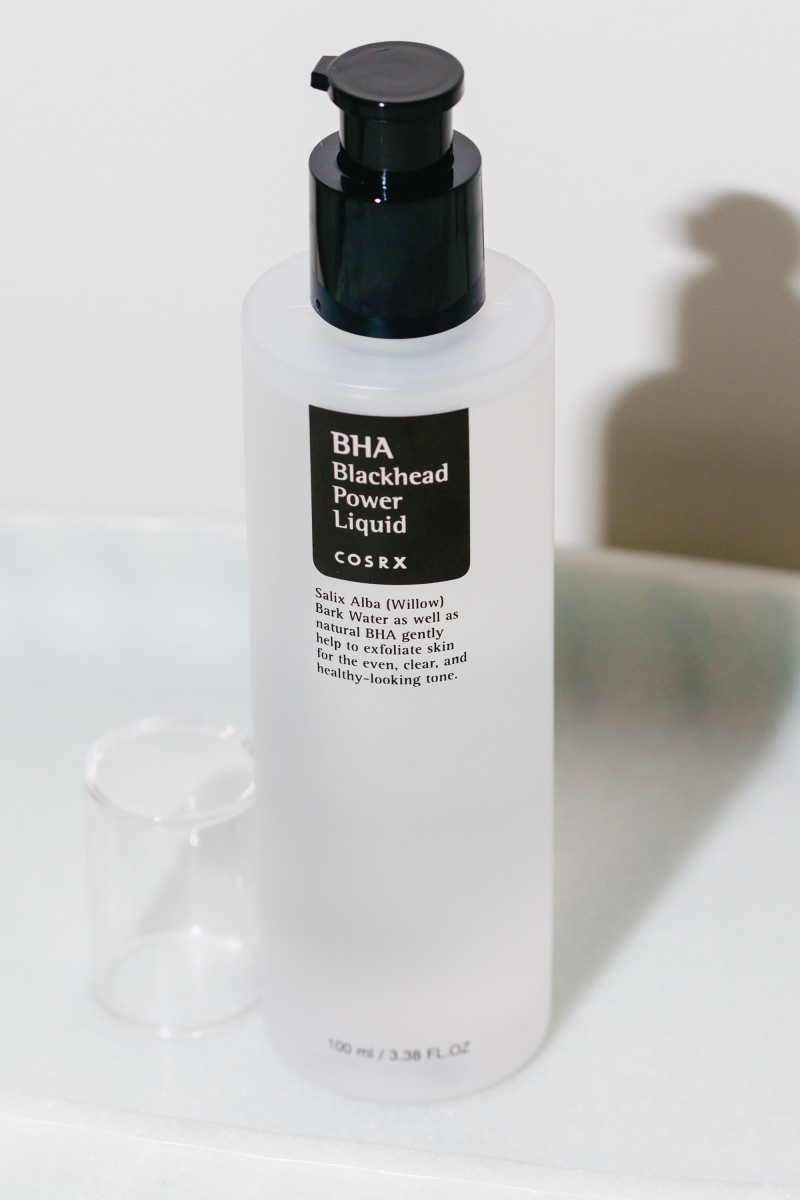
COSRX BHA Blackhead Power Liquid
When I step out of the shower, I slather on a generous layer of the COSRX BHA Blackhead Power Liquid, my favourite beta-hydroxy acid (BHA) treatment (reviewed here). Not only has it helped to clear my Drunk Elephant-induced breakouts, but it also works on fading the dreaded post-acne marks. And did you know that BHAs can also reduce redness? I was so relieved to go back to this product after T.L.C. Framboos left my skin dry and inflamed!
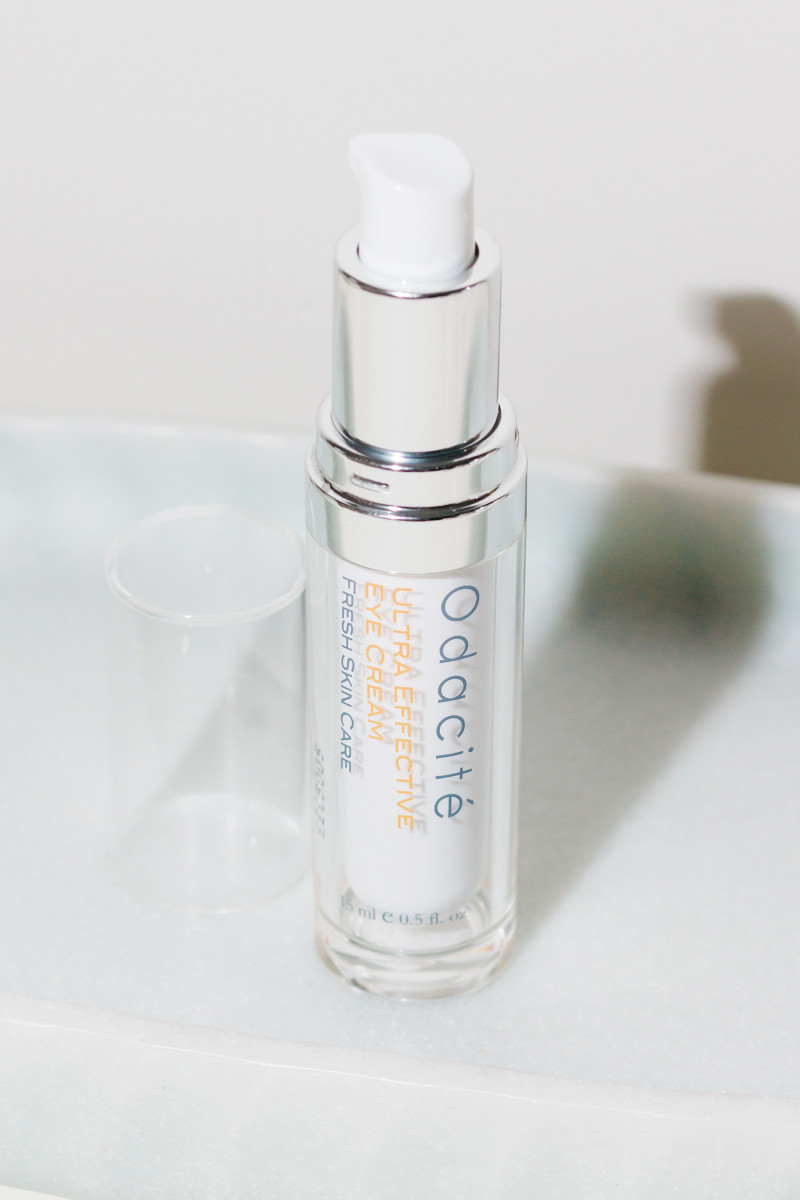
6. Eye Cream:
Odacité Ultra Effective Eye Cream
At the same time as I do my BHA, I also put on the Odacité Ultra Effective Eye Cream. I recently bought this because it’s made with all-natural ingredients including aloe vera, olive oil and jojoba oil. It’s very light, and non-irritating.
7. Pigmentation Treatment:
SkinCeuticals Discoloration Defense
To give the BHA enough time to work, I wait about 20 to 30 minutes before my next step, SkinCeuticals Discoloration Defense. For the job of fading post-acne marks, I figured this treatment would be ideal! It contains five percent niacinamide, which targets both hyperpigmentation and redness, along with tranexamic acid for brown patches, kojic acid for brightening, and sulfonic acid for exfoliation. I was a little nervous because it has a thicker texture than most serums, but it hasn’t broken me out at all. And the reviews are very positive!
8. Moisturizer:
Biologique Recherche La Grande Crème
As soon as the serum has absorbed, I apply a small amount of Biologique Recherche La Grande Crème, a moisturizer that I was also using in the winter. Normally, I’d switch to lightweight serums and essences in the warmer weather, but this cream is incredible—so light and non-greasy, yet hydrating. Also, it helps eliminate the flaky skin I tend to get from using an acid twice a day. The problem is, I don’t know what I’m going to do when it runs out, because the brand sent this to me and it’s $800+ Canadian!!!
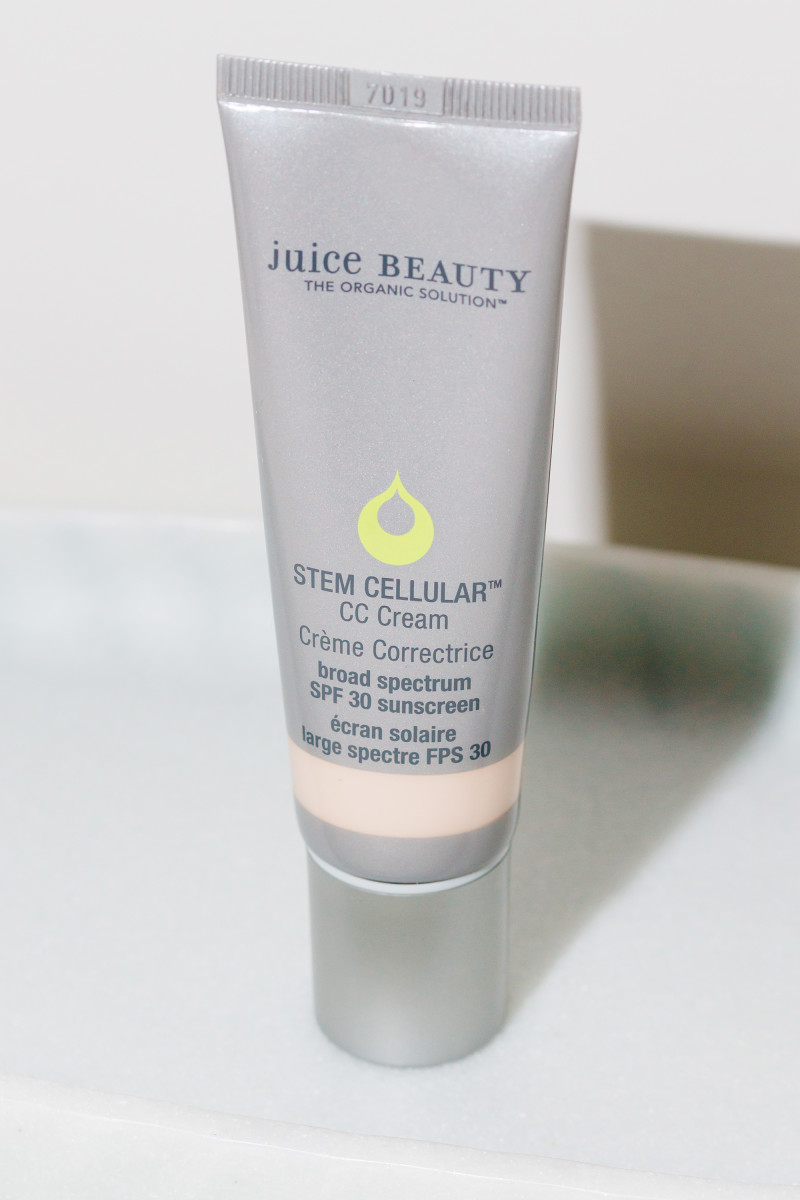
9. Sunscreen:
Juice Beauty Stem Cellular CC Cream SPF 30
For sunscreen, I’m using the Juice Beauty Stem Cellular CC Cream SPF 30 right now (while I wait on the new REN Clean Screen the brand promised to send me, since it’s not sold in Canada yet!). This one, reviewed here, has 20 percent zinc and comes in five sheer tints, so I basically use it in place of foundation or tinted moisturizer. The finish is pretty dewy, but it’s nothing that a little powder can’t fix.
10. Concealer:
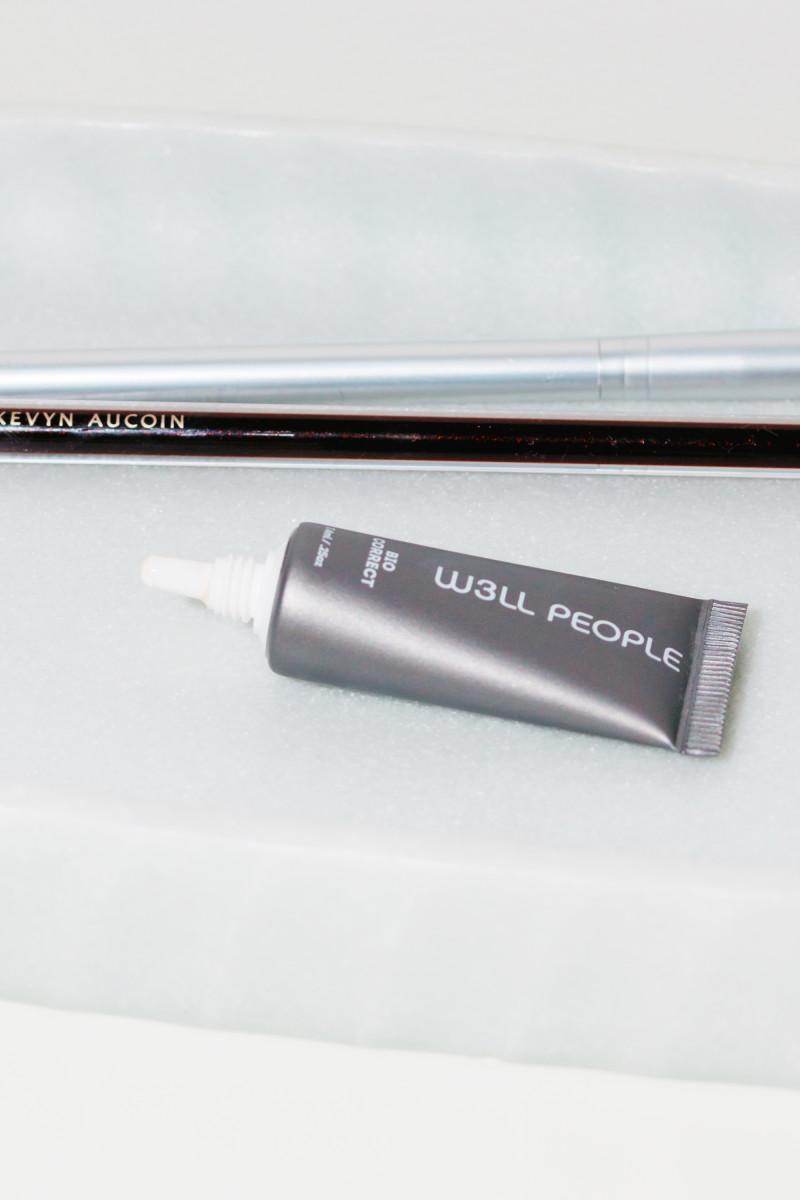
W3ll People Bio Correct Multi-Action Concealer
Next, it’s time to conceal those marks, and I recently started using the W3ll People Bio Correct Multi-Action Concealer. Unlike most natural concealers, it gives opaque but natural-looking coverage, even though it is silicone-free! Where has this been all my life?
For “pinpoint” concealing of pimples and dark marks, I apply it with the Kevyn Aucoin The Concealer Brush, an amazing brush with a tiny tip. I find it covers just as effectively as the Make Up For Ever Full Cover Concealer, which I was using before. But you can also use it for larger areas, such as dark circles, and it still looks super natural. I apply it there with the RMS Beauty Eye Polish Brush.
By the way, this is the only coverage product I’m wearing in the photo above, not even the CC cream or any powder. And I had a lot of marks to cover up… it works that well!
11. Powder:
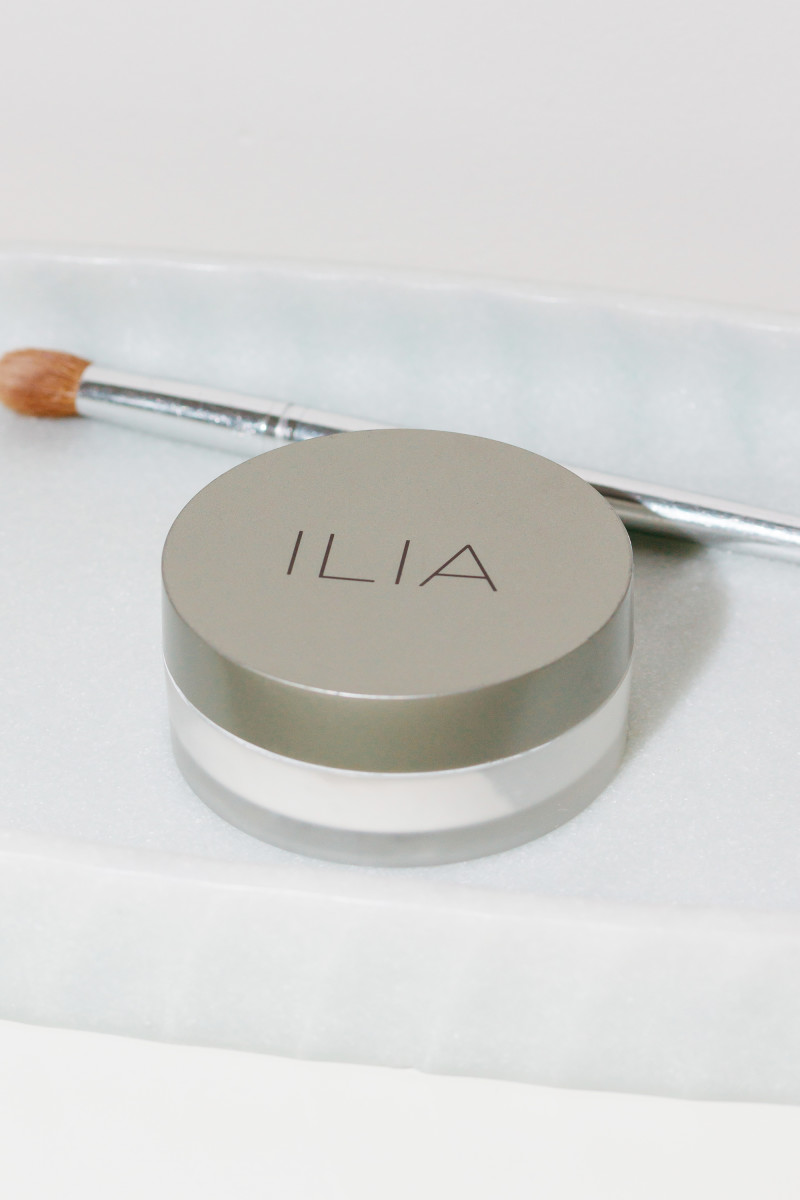
ILIA Soft Focus Finishing Powder
If my T-zone looks too shiny, I reach for my favourite ILIA Soft Focus Finishing Powder, a translucent corn starch- and silica-based powder that absorbs oil without drying you out. I always apply it sparingly with the Clinique Eye Shadow Brush instead of a big, fluffy brush, so I don’t look too powdery.
12. Bronzer:
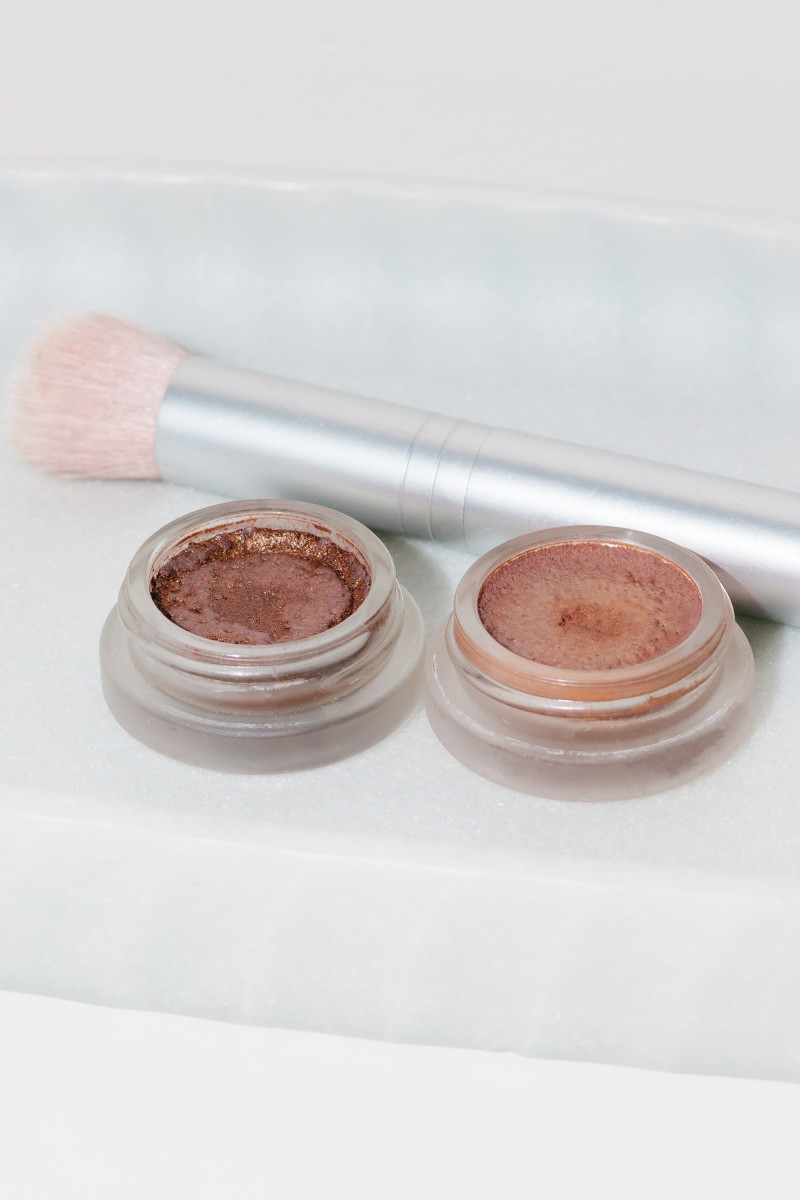
RMS Beauty Contour Bronze and Buriti Bronzer
Ever since RMS Beauty founder Rose-Marie Swift told me my skin was too red to wear blush (she’s blunt like that!), I switched to bronzer instead. I alternate between both of her bronzers; Contour Bronze is deep and brown-toned, while Buriti Bronzer is lighter with a hint of pink. They’re so sheer, they just give a hint of a sun-kissed look when I sweep them across my cheeks and the bridge of my nose (using the Skin2Skin Blush Brush).
13. Freckle Pen:
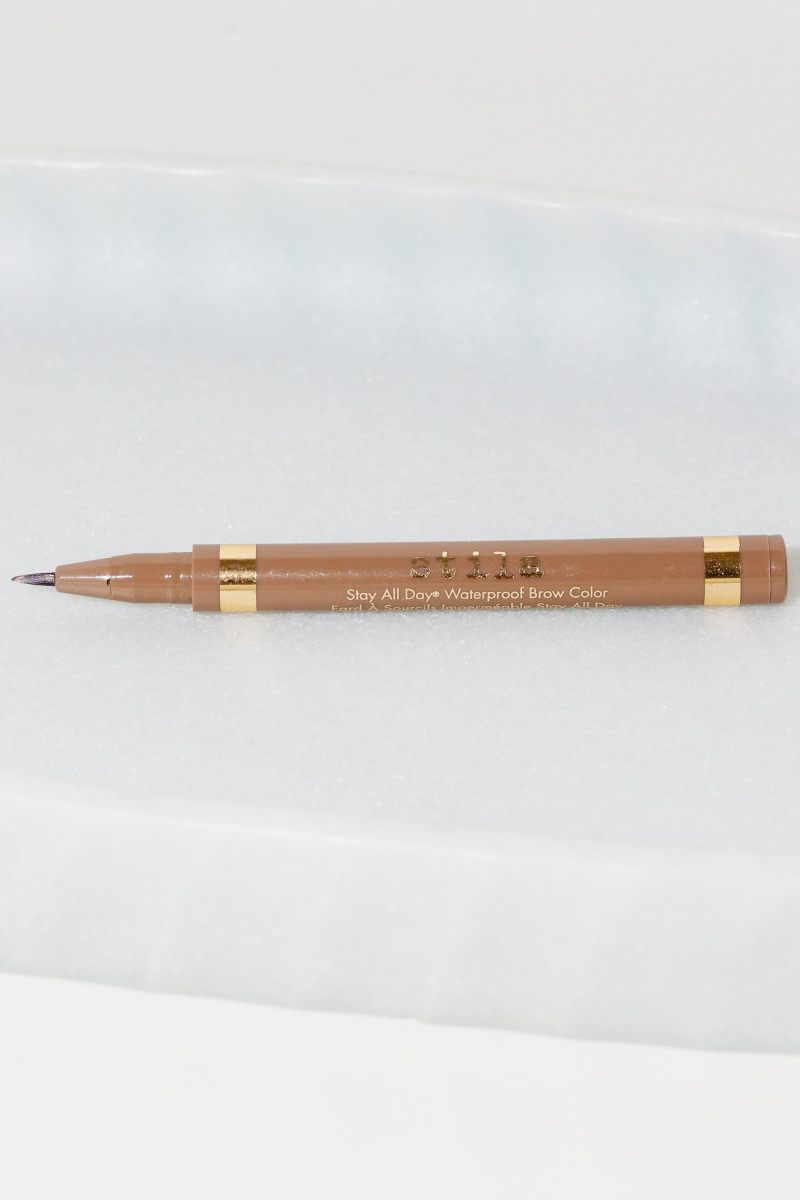
Stila Stay All Day Waterproof Brow Color
I know this sounds kinda crazy, but when I have time, I like to create and/or deepen the freckles across my nose with the Stila Stay All Day Waterproof Brow Color. It’s an old makeup artist trick to make your makeup look more natural; I also find it balances out my freckle pattern (since mine tend to be darker on the sides of my face, which isn’t so cute). I was using Anastasia Beverly Hills Dipbrow Pomade before, but I find this pen stays put longer. I also have the Freck OG Freckle Pen on order, which I suspect will be even better!
14. Highlighter:
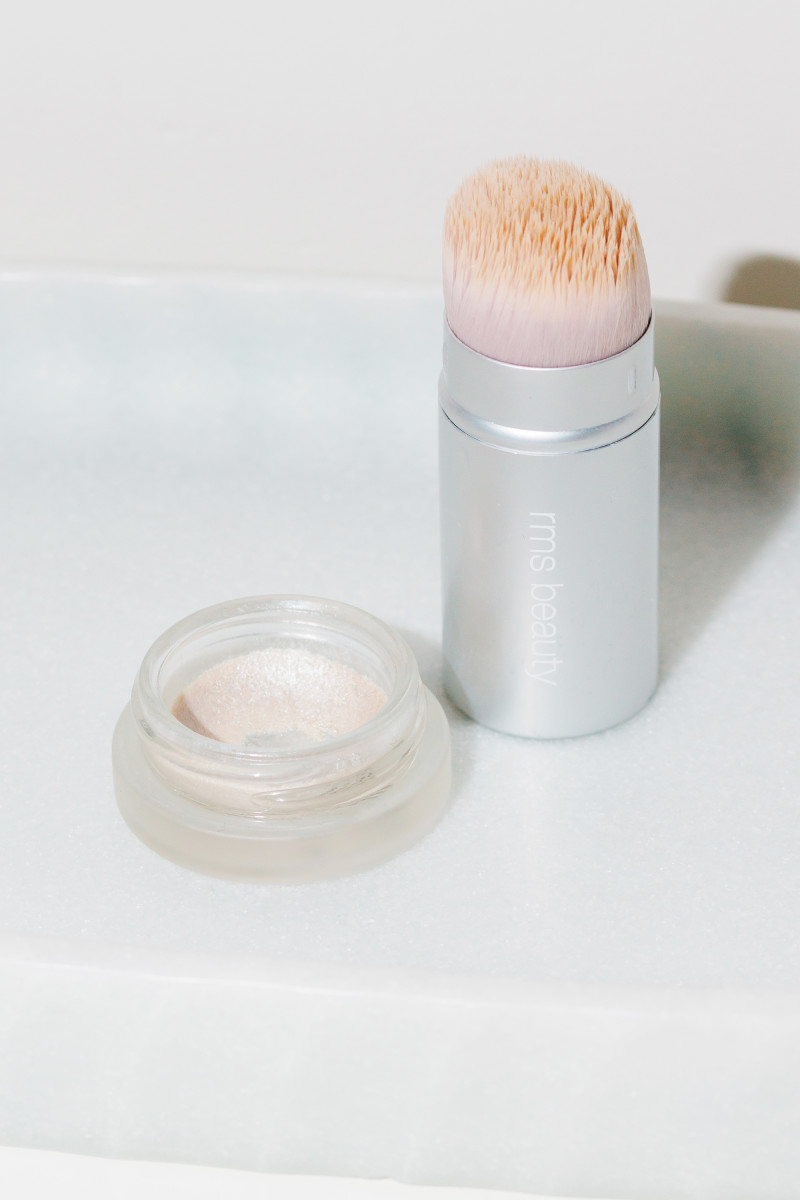
RMS Beauty Living Luminizer
For a little glow, I always use RMS Beauty Living Luminizer across my cheekbones, applied with the Kabuki Polisher. I swear, that little bit of light reflection makes people think you have better skin!
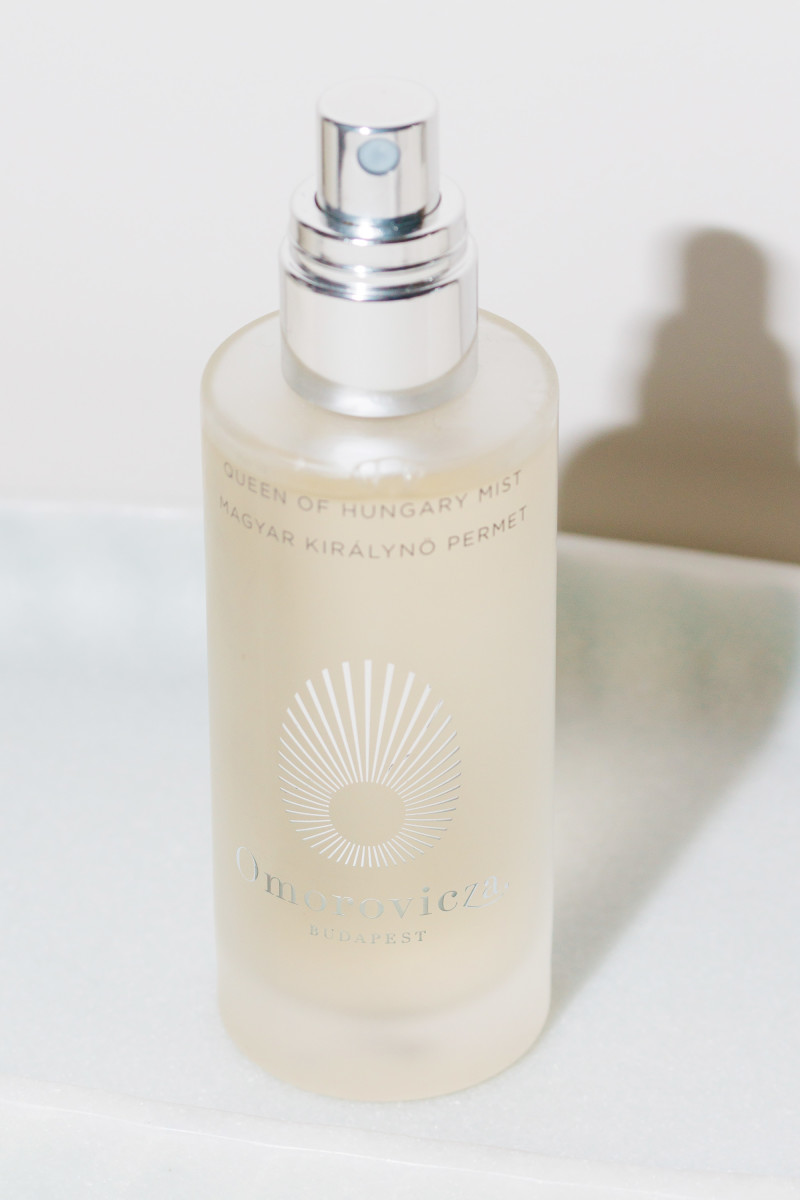
15. Face Mist:
Omorovicza Queen of Hungary Mist
I hate my skin to look too “done,” so mists are great for taking away any powdery residue. I’ve been getting into Omorovicza Queen of Hungary Mist lately because it dispenses such a lovely fine mist (and of course, smells gorgeous).
16. Tinted Lip Balms:
Kosas Kosasport LipFuel Hyaluronic Lip Balm and Lanolips Rose Gold 101 Ointment
I have two new tinted lip balms in my rotation. Lanolips Rose Gold 101 Ointment is a new rose gold version of their original clear balm, and I’m obsessed! It’s what I’m wearing in the photo above—just gives a nice coral-red tint with all the moisturizing benefits of pure lanolin.
The other is the Kosas Kosasport LipFuel Hyaluronic Lip Balm, which I find more pigmented, almost like a sheer lipstick. Of the two shades, I prefer the lighter, pinkier one called Rush; Pulse is a more intense brick red.
My Nighttime Skincare Routine
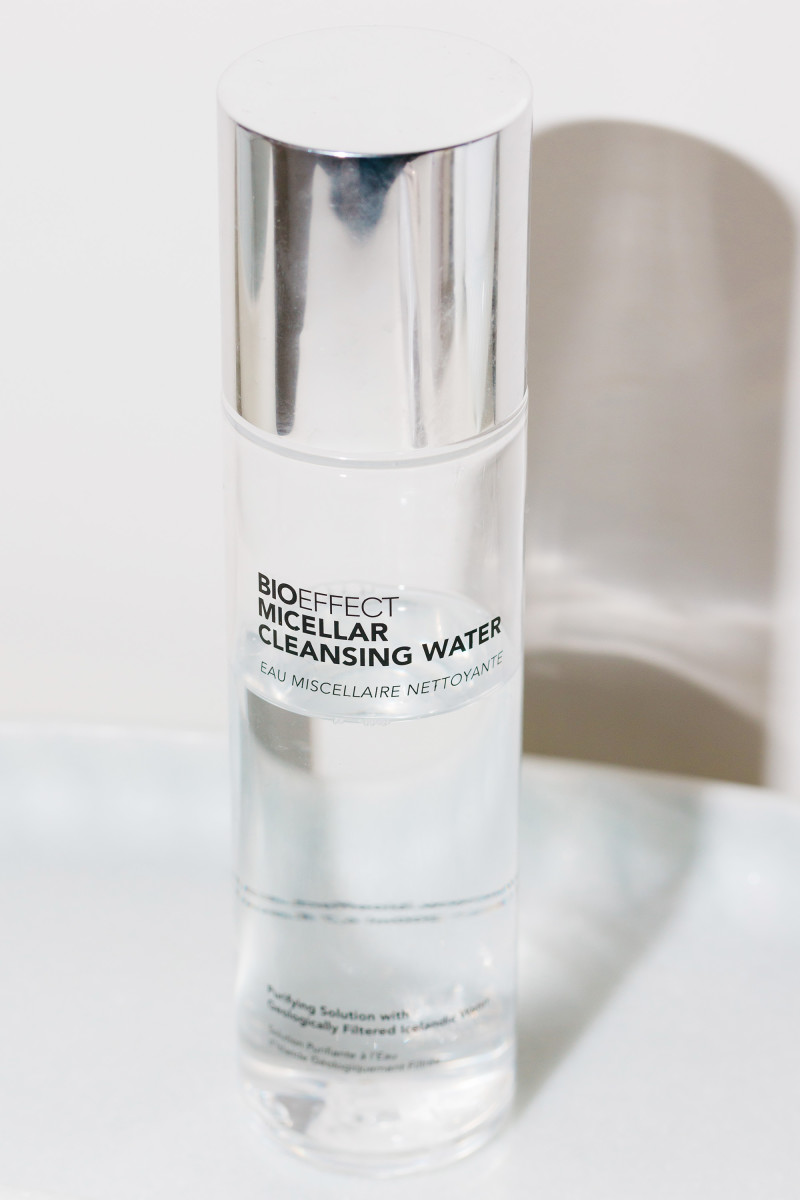
1. Makeup Remover:
BIOeffect Micellar Cleansing Water
My first step at night is to do a first pass over my skin with BIOeffect Micellar Cleansing Water on a Shiseido Facial Cotton. I might have to permanently switch from Bioderma, I like this micellar water so much! Even though it’s a “clean” product, there is zero difference in effectiveness.
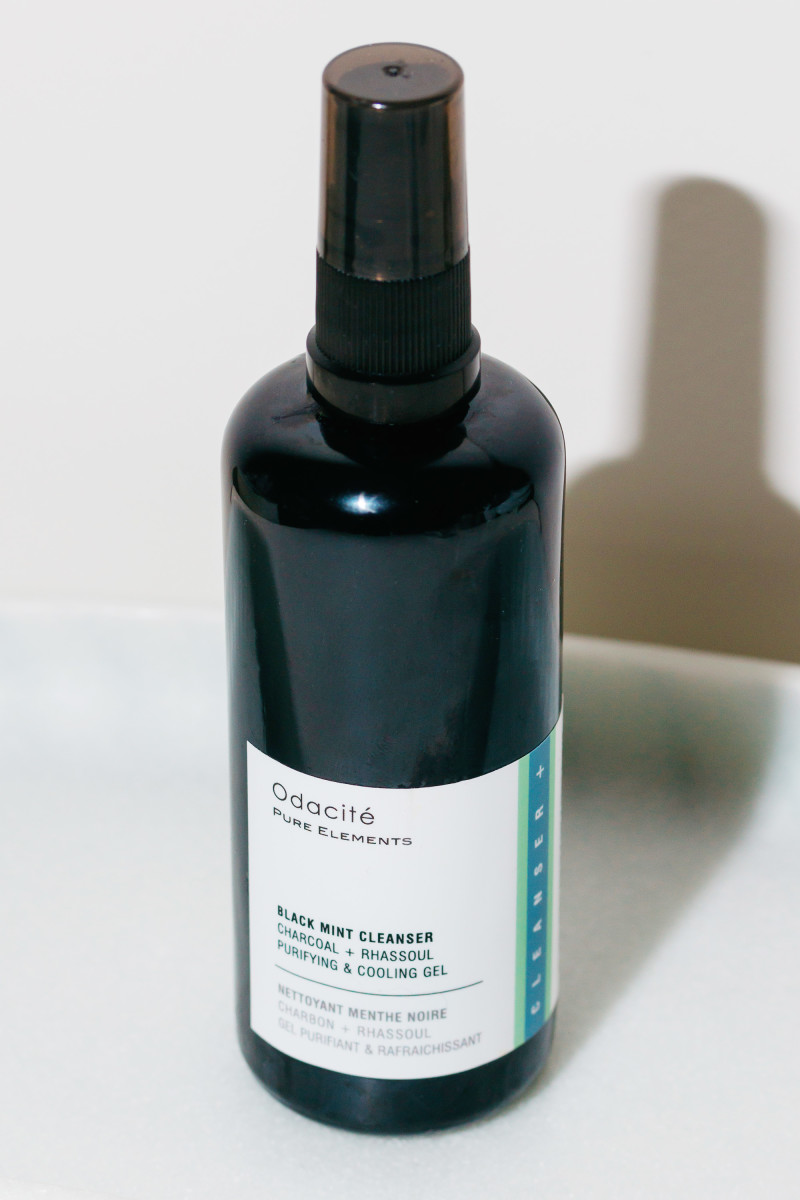
2. Cleanser:
Odacité Black Mint Cleanser
Next, I wash my face with the new Odacité Black Mint Cleanser. You might assume it would be harsh, since it’s a gel formula with charcoal, clay, tea tree oil and mint. But you would be wrong! It becomes a little creamy when it lathers, and gives you a deep clean without leaving your face tight or stripped. Love!
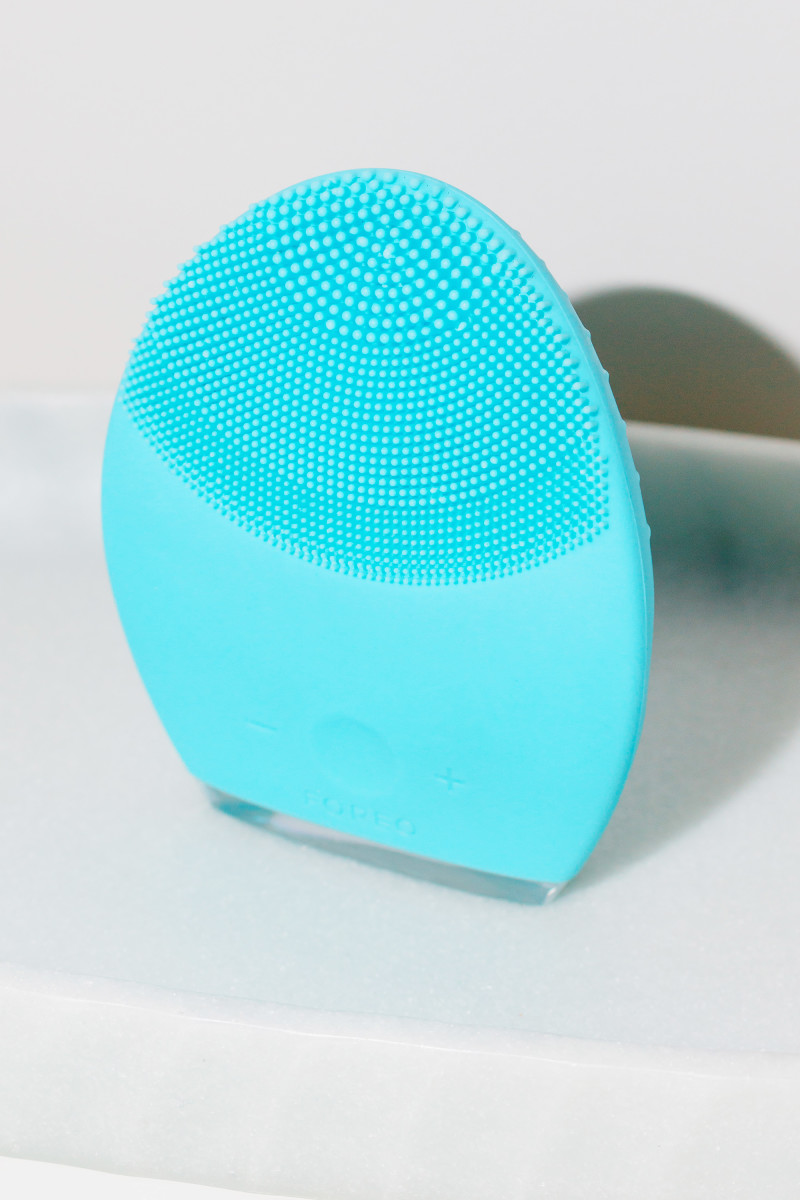
3. Cleansing Brush:
Foreo Luna 2 for Combination Skin
As usual, I like to use the Foreo Luna 2 for Combination Skin in conjunction with the Odacité Cleanser. It never irritates my skin like other cleansing brushes, and ensures that all traces of dirt, oil and makeup are removed. My skin can also get a little flaky from the BHA, and this helps buff that off.
4. Toner:
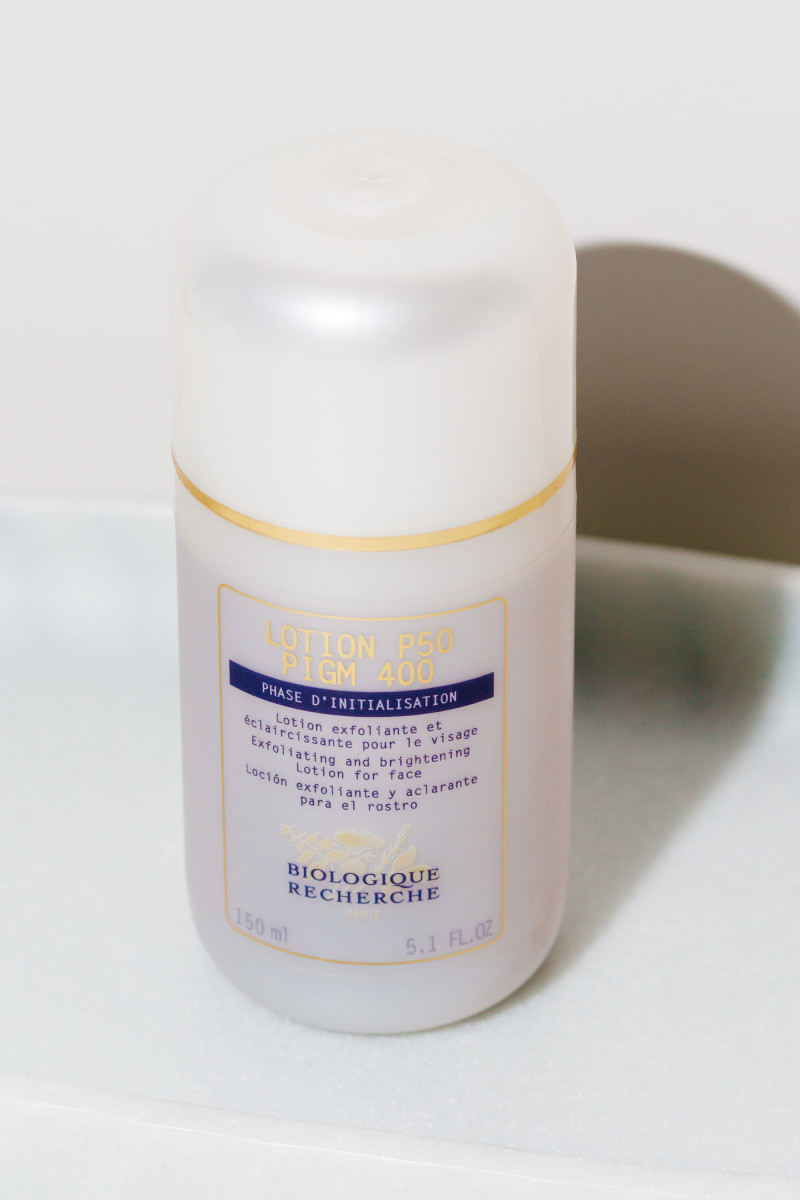
Biologique Recherche Lotion P50 PIGM 400
After I pat my skin dry, I use Biologique Recherche Lotion P50 PIGM 400 (again, on a Shiseido Facial Cotton) as a toner. Yes, I know it’s an acid treatment, too, but let me explain my thinking on this. After researching Padma Lakshmi’s skincare routine, I was reading up on her facialist, who says that EVERYONE needs to be using a toner. I’ve been struggling with this, because no toner seems to play well with my BHA—I always get a flushing reaction due to some unknown ingredient interaction. Then it occurred to me to try P50, and it doesn’t do that! Bonus: The anti-pigmentation ingredients in PIGM 400 will help me with the post-acne marks, too.
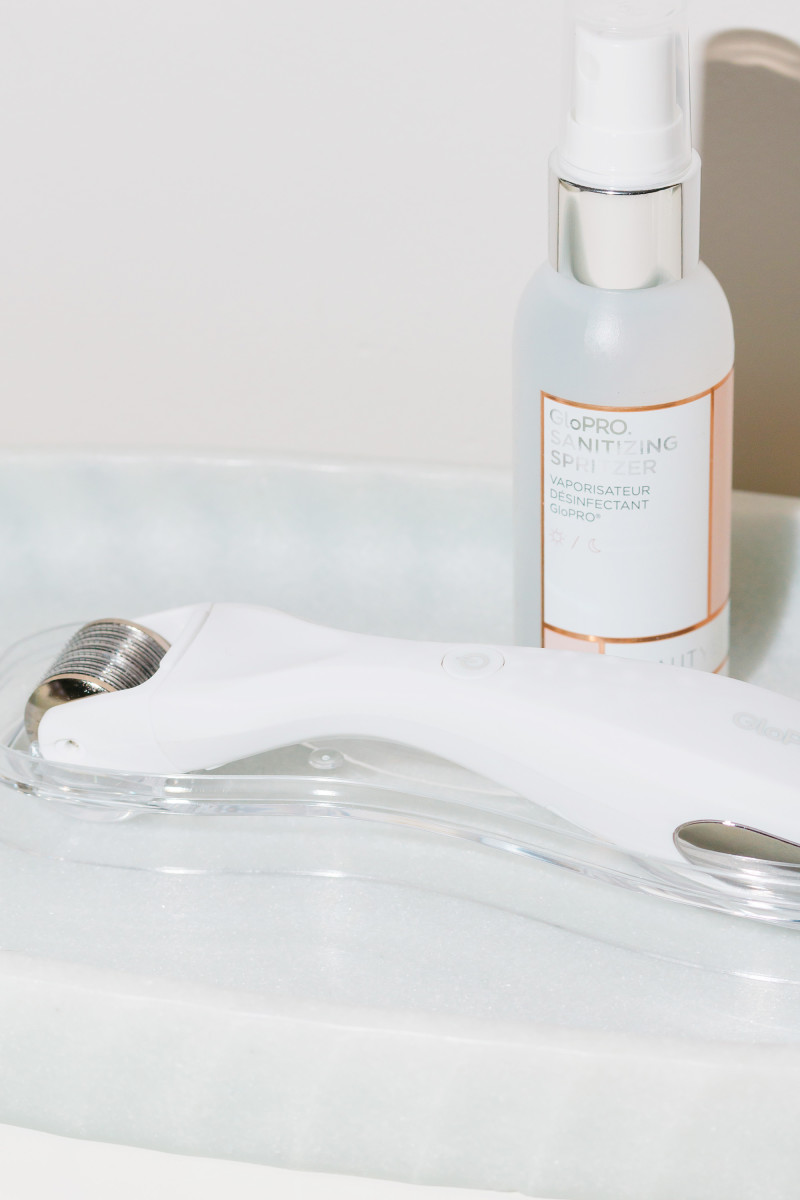
5. Microneedling:
BeautyBio GloPro Microneedling Regeneration Tool
Here’s where I’d fit in microneedling, although I definitely don’t do this every night—more like once or twice week right now, and I couldn’t do it when I had active acne. I’m using the BeautyBio GloPro Microneedling Regeneration Tool, which has a 0.3 mm needle length, the maximum I’d roll with at home. I’m just easing into it because it does make my skin temporarily inflamed and a little dry. Hoping I can build up a tolerance, the more I do it!
6. Hyaluronic Acid:
Timeless Hyaluronic Acid Pure
The main benefit of shallow needling is to increase the penetration of your topical products, but you’ve only got about 10 to 15 minutes before the needle holes close up! So, right away after rolling, I apply a few drops of Timeless Hyaluronic Acid Pure, which is a high-molecular weight hyaluronic acid serum with only four ingredients. According to the doctors at BareFacedTruth, there’s a real risk of granulomas and reactions if you apply the wrong topicals on freshly needled skin—that’s why this simple serum is one of the few products I’d consider safe.
That said, you can get even better results from applying vitamin A, so I want to buy Environ A, C & E Oil next! Even though it’s technically a body oil, it has been used with great success by microneedling expert Dr. Des Fernandes after treatments.
7. Red Light Therapy:
Red Light Man Red Light Device
Then, it’s a good time to do red light therapy to take down the inflammation from microneedling. Even though the GloPro has a built-in red light, I prefer a separate 10 minutes session in front of my Red Light Man Red Light Device, which is MUCH stronger. I actually use this almost every night, whether I’ve needled or not, as it’s so beneficial and relaxing! More on red light here and here.
8. Acid:
COSRX BHA Blackhead Power Liquid
After about 15 minutes, once the needle holes have closed up, I apply some COSRX BHA Blackhead Power Liquid again. (If I’m not needling, I do this straight after the P50.) For my last two routines, I was using the salicylic acid pads from First Aid Beauty or B. Kamins at night, but I’ve come to the conclusion that the COSRX works better for me. I think it might be the penetration enhancer, because my skin is clearer with this one.
9. Eye Cream:
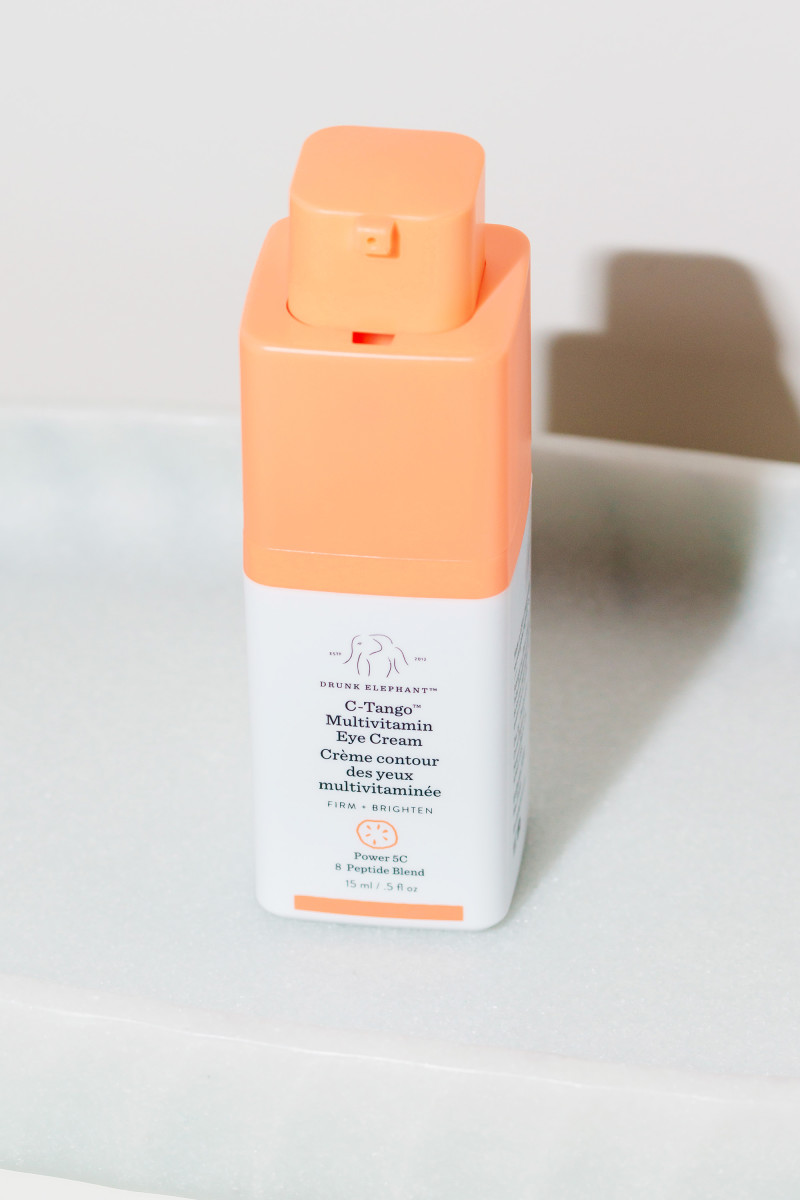
Drunk Elephant C-Tango Multivitamin Eye Cream
The only Drunk Elephant product I stuck with after my test was the C-Tango Multivitamin Eye Cream, which I recently purchased. What I like about this is that it’s creamy, yet fast-absorbing, and it hasn’t irritated my eye area so far. Plus, there’s a good amount of vitamin C derivatives in here for brightening.
10. Retinoid:
A313 Vitamin A Pommade
Then, I need to wait about 20 to 30 minutes before I apply my final skin step, A313 Vitamin A Pommade (reviewed here). So, usually this happens from bed! This is still my favourite retinoid—especially after giving it up for a week to test out A-Passioni, which gave me the cystic acne from hell. Even though A313 is far greasier, it’s far less comedogenic, and I love how strong it is!
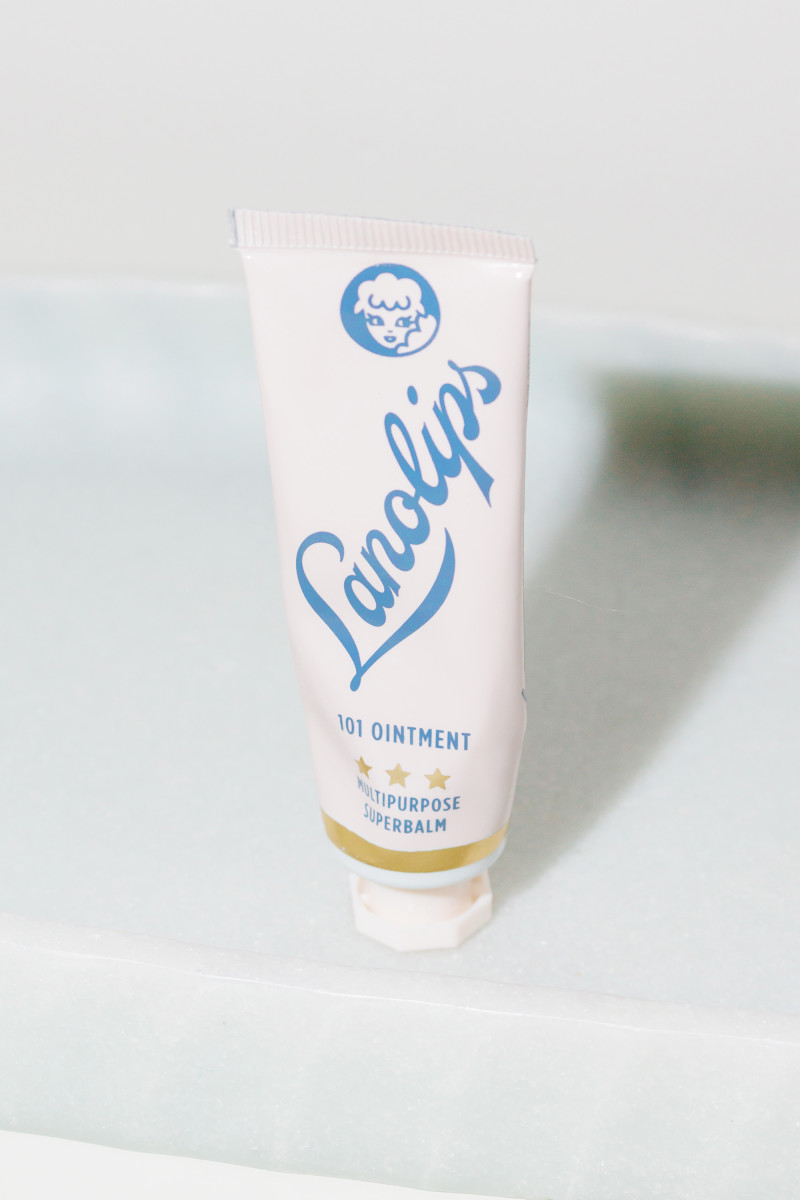
11. Lip Balm:
Lanolips 101 Ointment Multipurpose Superbalm
Last but not least, I always use Lanolips 101 Ointment Multipurpose Superbalm, a pure lanolin balm, to keep my lips nourished and free from chapping. It also works great on dry cuticles!
Conclusion
My spring skincare product from Odacité, Omorovicza, W3ll People, Drunk Elephant, BIOeffect, SkinCeuticals, ZIIP, Biologique Recherche, S.W. Basics, BeautyBio and Kosas.
So there you have it—my complete skincare routine for getting rid of post-acne marks while preventing future breakouts.
I know it sounds like a lot of steps, but keep in mind that I’m not ZIIP-ing and GloPro-ing daily. And yes, I do fall asleep sometimes before I get the chance to apply my retinoid!
I’ll be reporting back with more detail on both of those products, so stay tuned. And let me know if you’re interested in reviews of any others—the cleansing water, concealer and lip balm are so inexpensive, you NEED to try them!
Shop My Skincare Routine
Have you tried any of the products in my spring routine? Which skincare products are you loving lately?
Scientists stubbornly even refused to consider the possibility for decades. Yet, those who tried it swear that quitting diary made their acne vanish within a month. What kind of sorcery is this?!
The evidence’s mounting so fast, scientists had no choice but go back to their labs and give the whole “dairy gives you acne” thesis another go. Lo and behold, there IS a link..
Does Dairy Cause Acne?
It’s complicated.
Dairy does NOT directly cause acne. If you add Camembert to your sandwich, it’s not a done deal your face’s gonna erupt in pimples. Phew!
You’re just increasing your chances that may happen. Diary messes with certain hormones that play a part in the acne equation. Here’s what I mean:
How Does Dairy Cause Acne?
A 2018 study found that “intake of any dairy, any milk, full-fat dairy, whole milk, low-fat/skim milk, and yogurt regardless of amount or frequency were associated with a higher odds ratio for acne compared to no intake in individuals aged 7–30 years.” But why?
The short answer is that diary increases the levels of hormones in your body, triggering sebaceous glands to produce more oil than it needs. Too much sebum is always the first step towards acne.
The long answer? Here we go:
1. Diary Increases Hormone Levels
Diary messes with a few hormones that are involved in sebum production:
IGF-1: Short for insuline-like growth factor, it stimulates growth in every cell of your body. When your body has too much IGF-1, it increases the production of sebum and enlarges your pores. Just 3 servings of milk per day is enough to make it spike by 10%.
Added hormones: Cows (like any other mammal) produce milk only when they have to feed their babies. To make them produce milk all the time, you have to inject them with hormones that stimulate milk production. These hormones then end up in the milk you drink.
You know where this is going. When your sebaceous glands pimp out too much sebum, the excess gets stuck in the pores. Here, it mixes with dead cells to form clogs. If acne bacteria join the party, it’s pimples galore.
2. Lactose Intolerance May Cause Acne
Some people are allergy to milk. When they drink it, their immune system treats casein (the main protein in milk) as a threat and triggers the alarm.
It all starts when the bad bacteria in your gut overtakes the good ones that digest foods and make vitamins. Now they’re in the majority, these bad bacteria start causing all kinds of havoc.
For starters, they interfere with the digestive process and start producing nasty toxins. Not satisfied, they then attack the walls of your gut so these toxins leak out into your body.
This leads straight to chronic inflammation. Guess what acne is? An inflammatory disease!
If you’re not lactose intolerant, all’s good. But if you don’t feel right (like tummy rumblings and too much gas) after consuming dairy, your body may not be able to handle lactose all that well. Staying away from dairy can help reduce your acne (and improve your overall health).
Do All Dairy Foods Cause Acne?
Not all dairy foods are created equal. Some are more prone to give you acne than others:
Regular Whole Milk: Not as comedogenic as other types of milk, but it’s still loaded with hormones that can give you acne.
Skim milk: It’ s more likely to give you acne than whole milk. We don’t know why but it’s probably because it has a higher glycemix index.
Organic milk: A better choice than regular milk as it doesn’t have any added hormones, but it can still increase hormone levels in your body.
Cheese: It still has some problematic hormones, but it’s less likely than milk to give you acne.
Greek Yogurt: Out of all the diary products, it’s the least likely to give you pimples. Probably because of the added good bacteria that help you restore balance in the gut and decrease inflammation.
Ice creams: It’s one of the worst culprits. But scientists think it’s because it makes your blood sugar levels spike like crazy (sugar has been linked to acne, too).
If you can’t give up milk with your cereals, switch to nut milk. Coconut, almond and oat milks don’t have any of the hormones found in milk, so they won’t give you acne.
The Bottom Line
Diary does NOT directly cause acne. But it can increase the risk of getting acne for some people, especially those intolerant to lactose. If you suspect milk is giving you acne, go without it for a few days and see how your skin reacts. It may finally clear up for good.
What do you think about the link between diary and acne? Share your thoughts in the comments below.
Take The Guesswork Out Of Skincare Shopping
Get access to the “Pro Skincare Library” for exclusive skincare routine “cheat sheets” and tricks to help you navigate the beauty aisles jungle like a pro and immediately know what to pick off the shelves to achieve the gorgeous skin of your dreams – even when you’re drowning in an endless sea of skincare products.
Success! Now check your email to confirm your subscription and get access to the skin library.